A Vegan Obsession

  • Home
  • Recipes
  • Travel
  • Product Reviews
  • Giveaways
  • News & Interviews
  • About
  • Contact

Vegan Donuts Los Angeles

February 7, 2015 by India Leigh

Vegan Donuts Los Angeles

IMG_1269

Vegan donuts Los Angeles.

Donut Friend two words in the English language that are good, whether alone or together. Donuts are great. Friends are great. Put together? Well, after eating a pillow of doughy, adorned heaven at Donut Friend, for a moment the world drops away to reveal a glorious illumined alter of the baked bonne bouche. Really, you say..is it that good?! Ok so vegan baked donuts that taste like they are fried with GLUTEN FREE options that you can either dress up with one of their crazy good on-menu (sweet and savoury) flavours, or, OR make up from your own limitless crazy imaginations. Yes, DIY. They slice the donuts in half and that creates a lidded platform for you to fill, stuff and cram as you see fit. THEN, yes then you get to have it drizzled, dipped, sprinkled and literally drowned in more sensational toppings.

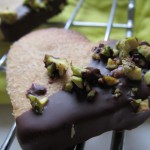
I went straight for the DIY option, with a gluten free donut. After much deliberation I opted for the raspberry habanero jam and coconut cream filling. Chocolate and vanilla glaze. Gloriously topped off with coconut bacon. My fingers were restless as I watched them create my masterpiece. I was eager to get my hands on it. Did my friends look at me strangely to see the over-the-top pure excitement I was displaying for a donut?! No matter. It was worth getting excited about! Picking it up it was dripping in glaze, I bit into it and waited for the flavours to tinkle my tastebuds like a piano player on the ivories! It was insanely good! The jam packed an intense sweet heat, the coconut bacon was crisp and smokey and the flavours played together like a symphony! The donut was baked but it tasted every bit fried. It was so delicious!!

I had to quell the oink within to hold back from trying all the flavours that were teasing mercilessly behind the glass! Friend J had the blueberry loaded ‘Husker Blu’, Friend C had the ‘Angry Samoan’, a chocolate and coconut adorned creation. C said he could not tell the difference between the gluten and the non-gluten donuts. They both admitted my DIY donut was totally delicious. I took another friend a day or so later and they said that they’d never know it was vegan and it was the best donut they’d had. It definitely was mine too!

Feast your peepers on the menu - I dare you not to salivate with creations like; caramelised apple, with vegan cheese, caramel and toasted peanuts, strawberry shortcake, pastry cream & chocolate, the S’Morrissey with a chocolate cake donut filled with toasted marshmallows and topped with chocolate glaze and graham cracker crumbs!!!!

As if you’d care with all that amazing ‘can you even believe it’ ‘have I died and gone to heaven’ ?going on but the prices are good, the donut shop is located in a fun, cozy part of town and the staff are squeezably nice too! It is not an all vegan place but it is mostly. Which you can tell by the fact they * the non-vegan items!

If all that is not enough, Donut Friend are also in Highland Park, a fun, hip and friendly area of town which I have fallen madly in love with. I will be going back again. And again, and again…and again. Nothing wrong with having donuts for lunch!

IMG_1270

donut friend blueberry

IMG_1340

IMG_1282

IMG_1265

IMG_1267 IMG_1265

IMG_1284

Mine, all mine!

IMG_1295

Yes, well it is a confection laden donut, it was never going to be the glamor shot!


Donut Friend

5107 York Blvd, Los Angeles, CA 90065

Filed Under: California, Los Angeles, North America, Restaurant Reviews, Vegan Travel Tagged With: cafe, donuts, filled, gluten free, highland park, Los Angeles, Vegan

Raw Food Cookbook Review & Giveaway

December 19, 2014 by India Leigh

Raw Food Cookbook Review & Giveaway

easyaffordableraw

Lisa Viger has been vegan and mostly raw for 10 years now. Her fresh, youthful face belies her age. She’s still rocking it at 50!

A number of health issues, lack of energy and general malaise Lisa on the path to ditching the canned and packaged foods and incorporating a mainly raw diet into her life. She says she is stronger and more flexible than she ever remembers being even in her 20s!

Unknown

A few years ago, Lisa began writing a blog. She set out to set the record straight about the view of healthy food being way too expensive. A belief that is held for raw food in particular. When I got hold of a copy of the book and looked at her recipes even I could not help but be sceptical. Well, nuts are expensive, right?! And raw foodists use a lot of nuts. But each of the tasty looking dishes, smoothies and desserts cost less that $2.50 to make. Bringing the total well under her $10 a day total. This is not to mention the money that could be saved on healthcare costs in the future. Eating healthily and choosing organic really can pay dividends. The blog was hugely successful. A cookbook followed.

The cookbook is super useful, equally for ‘old hands’ and those new to cooking (or should I say uncooking..or better..preparing) foods. The first few chapters are dedicated to visual, storyboard techniques for preparing vegetables in exciting ways, making nut milks, sprouting and dehydrating. Yes, you will need a dehydrator for a few of the recipes, especially the raw breads and crackers but if you do not have one it does not detract from the book.

Containing over 100 recipes. I’ve a list of recipes to try. These are a few that turned my head!

Romaine Broccoli and Caramelized Onion with Lemon Tahini Dressing

Spicy Mango and Cucumber Soup with ‘Noodles’ (made from zucchini)

Beet Salad with Basil Nut Cream

Curried Chia-Kraut Crackers (for the day when I stop travelling and my dehydrator and I become reunited).

Pumpkin Pie (made with carrots!…but to taste like pumpkin)

There is even a Chocolate Chapter! Hoorah!

easyaffordableraw1 easyaffordableraw3 easyaffordableraw4 easyaffordableraw5

Lisa puts this all together with tips on reducing prep time, stocking your pantry and budgeting tips. If you are considering a new years resolution to eat healthier in 2015, it’s all here. You want the book, right?! We’ve got one copy of the book to giveaway. US entrants only. Try your luck.


Raw Food Cookbook Review & Giveaway
a Rafflecopter giveaway


Filed Under: Giveaways, Product Reviews Tagged With: affordable, Budget, cookbook, Easy, gluten free, healthy, raw food, Vegan

Seed + Salt New Vegan Cafe Opens in San Francisco

December 1, 2014 by India Leigh

Seed + Salt New Vegan Cafe Opens in San Francisco

seed+salt

A long anticipated, now it is here. Seed + Salt New Vegan Cafe Opens in San Francisco.

I was fortunate to be invited to the preview party on Friday. I honestly did not know what to expect but from my research on the owner, I believed it would be something special.

Located on Chestnut Street, Marina District, a rather sophisticated, trendy shopping street a mere stones throw from a magnificent view of the Golden Gate Bridge, Seed+Salt has a crisp, clean, beechwood and white interior. If it is possible to effuse an atmosphere of health then this place does. It was packed with friends and family, gathered to do a trial run before opening proper.

The owner, Mo came and greeted me warmly. I have to say everything about this woman is beautiful. No flapping, ‘rabbit in the headlights’ , opening day panic was evident as she talked me through the menu. I was fascinated by her zen like air. I discovered that Mo was born with entrepreneurial DNA. At 8 she was making greeting cards and selling them in her neighbourhood in Michigan. She had balance sheets and plotted every sale and every cent. She said it just was the most natural thing for her. She then grew up and founded a marketing company. Sold it years later with a substantial book of large corporate clients. Mo then sidestepped into making designer jewellery. She told me that opening a restaurant was never part of her vision but she got a sense a couple of years ago that she wanted to build a place that served the type of food she wanted to eat. Plant based (vegan), gluten free and processed sugar free. She hired a chef from Brooklyn and over 1.5 years they developed a menu that she is really proud of. This was all whilst bringing up a small child and running several of her other businesses. ‘How do you juggle it all and look so calm?’ I asked. Meditation, came the answer.

Mo wanted to create the cleanest food that could be delivered quickly. It’s a walk up to the counter place. The menu has soup, bowls, breakfast items, sandwiches - her eggplant bacon BLT was a hit with the customers (friends/family) I chatted with. Over 90% of the menu items are made in house from scratch, from cheeses to all the delicious spreads (she plans to sell on her product line one day) and her (one day sure to be famous) nut bread and baguettes (gluten free!!). Her ‘clean’ ethos extends to all the cutlery, takeout boxes, napkins etc. All green as can be and compostable.

So, what was it like you ask?

seed+saltserver

seed+saltchef

Incredible Chef Ariel Nadelberg.

moclancy

Mo Clancy. Owner of Seed+Salt.

I began with cookies. They just called to me from the stand. Chocolate chip and ginger molasses. Soft, chewy, crumbly, perfectly sweetened and very morish. One of the best cookies I’ve ever had! And healthy to boot! Just how all food should and, as inventive vegans are discovering, can be.

seed+saltnutbread

Next I sampled a selection of the spreads suggested by Mo. I tried the nut bread topped with wild mushroom and walnut spread, house made cheese, and a chimichurri sauce. The tri-combo of spreads were incredible. Their cream cheese is exceptional, and I can say that as I have tried many on the market. The whipped mushroom spread was flavoursome and light. The vibrant chimichurri was perfect and added an acidity that made for a reverential mix of flavours and a great acidity/creamy/umami balance.

seed+saltlemoncurd

Warm from the oven, the flourless nut bread is packed with nuts and seeds but it somehow manages to be light. Mo suggested I tried the chia seed jam coupled with the raw lemon curd. The cool sweet but slightly tart curd on top of the warm bread and the thick chia seed jam were so very, very good. The curd is like a smooth citrus butter cream and it is spoonable, sweet loveliness.

seed+saltsandwich

This is the eggplant bacon sandwich. Most of the people in the party I spoke with were carnivores. Each and everyone declared the eggplant bacon had a great flavour and closely matched the flavour of bacon and was worthy of much respect.

seed+saltburger

seed+saltsmoothie

Everyone I spoke to declared the food to be full of flavour and satisfying. The cookies and nut bread and spreads were very filling. I had no room for anything else. I will be returning for sure. I have to try that eggplant bacon, and the soup, and the blackbean tempeh.

Seed + Salt is a great concept, set to flourish in San Francisco and no doubt, from what I know of the beautiful Mo Clancy, in every city another Seed+Salt appears. The staff are super friendly and passionate about their fayre. The food will speak for itself. Seed+Salt is a sure fire hit.

Seed + Salt New Vegan Cafe Opens in San Francisco. December 2nd 2014. 2240 Chestnut Street, San Francisco.

Hours 7am - 8pm.

Filed Under: California, North America, Restaurant Reviews, San Francisco, Vegan Travel Tagged With: breakfast, burgers, dinner, gluten free, healthy food, lunch, Marina, nut bread, San Francisco, sandwiches, smoothies, soup, spreads, sugar free, vegan cafe

Vegan Cookbook Review and Giveaway

November 27, 2014 by India Leigh

Vegan Cookbook Review and Giveaway

icouldnevergovegan2

My current bedtime novel has been relegated to the back of the nightstand ever since I got hold of a preview copy of a brand new vegan cookbook, ‘But I Could Never Go VEGAN’. I have been voraciously thumbing through the recipes. The book is now peppered with Yellow Post-It notes acting as bookmarks of recipes to try. Of these there are many. I would end up listing 90% of the 125 recipes if I told you them all. So here are a few.

  • Tempeh Bacon Mac ‘n’ Cheese with Pecan Parmesan
  • Mushroom Grilled Sandwiches with Sunflower Cheddar
  • Balsamic Baked Pears with Cashew Blue Cheese
  • Savory Corn Cheesecake with Cilantro Pepita Dressing
  • Parmesan-crusted Avocado and Kale Florentine with Smoked Paprika Hollandaise
  • Sesame-Sriracha Tofu Sandwiches
  • Caramel Apple-Stuffed French Toast
  • Potato Sauerkraut Soup with SausageCrumbles
  • Double Chocolate Truffles
  • Molasses Hazelnut Chocolate Mousse Tart with Coconut Whip

Mouth watering. Yep. Author Kristy Turner set out to do just that and debunk any myth about vegan food. Her inventive chapters address concerns that carnivores may have about eating vegan..with titles such as; I Could Never Give Up Cheese, I’d Miss Pizza, It’s All Rabbit Food and Friends Won’t Want To Come For Dinner. Kristy has mouthwatering, myth smashing recipes to show you there is NOTHING to worry should you want to eat vegan. It’s so inviting, Can’t I Be Pescatarian Instead chapter lists recipes like Beer-Battered Faux Fish & Chips and Wild Mushroom Sushi. I hardly know where to begin!

There are many gluten free dishes in the book too. Nearly all of the recipes have food porn photos shot by her talented photographer husband Chris Miller.

Kristy, author of the fabulous food blog Keepinitkind, was once a professional fromagier. A self-confessed ‘die-hard cheese nerd’. She says she has never been more inventive or satisfied in the kitchen until she went vegan.

kristyturnervegan

The book is absolutely gorgeous. Stunning photographs with simple and easy to follow recipes.

Look at these amazing dishes! They will revolutionise your families meal times.

icouldnevergovegan3 icouldnevergovegan4 icouldnevergovegan6 icouldnevergovegan7 icouldnevergovegan8

My carnivorous friend getting stuck into the book. If I had a dollar for every time they exclaimed ‘oh my God!’….

icouldnevergovegan9


Here is the fun book trailer.

The cookbook will be available for sale from December 2nd.

The great news is we have ONE copy to give away. Enter below. Good luck!

a Rafflecopter giveaway

Filed Under: Giveaways, Product Reviews Tagged With: cookbook, cooking, easy recipes, gluten free, kristy turner, Recipes, simple recipes, Vegan

Vegan Tamales Recipe

November 21, 2014 by India Leigh

Vegan Tamales Recipe

tamale huit2

Tamales. For those that have been following this blog for a while you will already know my love of Mexican Food and my soft spot for fragrant, steamy, carb loaded tamales! My first ever tamale experience was on a road trip and a hastened ready meal by Amy’s Kitchen. I then blazingly stalked La Guera Tamalera for her amazing tamales when I visited Los Angeles. I even managed to find vegan tamales when I was in travelling in Mexico. I’ve been making my own tamales ever since. Whenever I can get my hands on corn husks. Or I just use organic non-bleached parchment paper if I am really desperate for a tamale fix.

It was on my travels in Mexico that I discovered huitlacoche, a corn fungus (stick with me!) whilst at a farmers market in Oaxaca. Mesmerised I watched the deft hands of a beautiful Mexcian woman form a ball of pale corn dough into tortillas and then with one hand slap them onto a pale earthware, drum shaped griddle. A comal. Fired from underneath, a traditional Mexican cooking method as old as time. The smells that rose from the hot surface were intoxicating. My two months of Spanish lessons taken whilst in Argentina and followed up in Mexico (since forgotten by lack of use) paid off and I was able to string the words together to enquire if she could feed a hungry vegan. A passing American expat saved me when she scooped up a mass of a shining black ingredient. She passed a spoon in front of my nose, spoke a word I did not understand. ‘It’s corn fungus..nothing to alarm you. Delicious. Try it’. The tanned Texan said, encouragingly. The woman spooned sautéed spinach, the exotic corn fungus (known as huitlacoche) and decanted vibrant green salsa onto two tortillas with a flourish. A minute to warm it through and it was wrapped and handed to me with a smile. It cost barely anything.

I sat at a long communal table under the shade of a tree and experienced corn fungus for the very first time. It tasted faintly of corn, and mushrooms, but with a mildly tart, earthy flavour note completely new to me. After a split second..I was hooked.

I hope you can buy huitlacoche where you live. The flavor is perfect nestled inside warm, fluffy, steamed masa dough. If not, there are substitutions listed for you below.

Vegan Tamales

For the vegan tamales recipe you will need;

3 cups masa flour
1 teaspoon baking powder (gluten free it that’s appropriate for you)
1 teaspoon Himalayn salt
4 tbs coconut oil, melted
2 cups of water (approx…gradually add and just use enough to make a dough)
1 package dried corn husks

For the filling

1 can huitlacoche - if you are unable to obtain this where you live then substitute with crimini, portabello or shiitake mushrooms

2- 3 pinches of chilli flakes

salt & pepper as needed. The huitlacoche is salted but you may wish to add a little more.

optional - spinach or kale sautéed in olive oil and garlic

Method

huitlacoche

Whilst your corn husks are soaking in hot water for 30 mins (use a large pan and use a lid to hold them under water), prepare your masa dough.

masa flour

masa flour 1

Mix the flour with the melted coconut oil, salt and baking powder. Add water.

making tamales

Spread the masa dough onto the soaked corn husks. Place a line of your filling into the centre.

Bring the sides of the husks together, gently rolling the dough to enclose the filling. Use the husks to gently squeeze and roll, making a seal. Fold the top and bottom of the husks over to close. Tie with torn strips of the husk (easier said than done) or string. Or just fold and gently place in the steaming basket. When all jostled together the tamales will not really need tying. And anyway, I can never get the husk string to hold. Something I still need to learn!

making tamales 2 making tamales 3

Use a steaming basked in a large pan. Have about 2 inches of water in the bottom. Make sure it doesn’t rise above the steamer basket. Keep an eye on the water level. Steam for about 35-40 mins. Leave to cool slightly before serving as they will of course be hot to handle.

I served these with a spicy guava and cilantro salsa.

tamales huit vegan tamales 2 vegan tamales

Let us know in the comments below how your tamales turn out!


Vegan Tamales Recipe
 
Print
Prep time
20 mins
Cook time
40 mins
Total time
1 hour
 
The lightest, fluffiest vegan tamales.
Author: India Leigh
Recipe type: Lunch
Cuisine: Mexican
Serves: 12
Ingredients
  • Vegan Tamales
  • For the vegan tamales recipe you will need;
  • 3 cups masa flour
  • 1 teaspoon baking powder (gluten free it that's appropriate for you)
  • 1 teaspoon Himalayn salt
  • 4 tbs coconut oil, melted
  • 2 cups of water (approx...gradually add and just use enough to make a dough)
  • 1 package dried corn husks
  • For the filling
  • 1 can huitlacoche - if you are unable to obtain this where you live then substitute with crimini, portabello or shiitake mushrooms
  • 2- 3 pinches of chilli flakes
  • salt & pepper as needed. The huitlacoche is salted but you may wish to add a little more.
  • optional - spinach or kale sautéed in olive oil and garlic
Instructions
  1. Whilst your corn husks are soaking in hot water for 30 mins (use a large pan and use a lid to hold them under water), prepare your masa dough.
  2. Mix the flour with the melted coconut oil, salt and baking powder. Add water.
  3. Spread the masa dough onto the soaked corn husks. Place a line of your filling into the centre.
  4. Bring the sides of the husks together, gently rolling the dough to enclose the filling. Use the husks to gently squeeze and roll, making a seal. Fold the top and bottom of the husks over to close. Tie with torn strips of the husk (easier said than done) or string. Or just fold and gently place in the steaming basket. When all jostled together the tamales will not really need tying. And anyway, I can never get the husk string to hold. Something I still need to learn!
  5. Use a steaming basked in a large pan. Have about 2 inches of water in the bottom. Make sure it doesn't rise above the steamer basket. Keep an eye on the water level. Steam for about 35-40 mins. Leave to cool slightly before serving as they will of course be hot to handle.
  6. I served these with a spicy guava and cilantro salsa.
Wordpress Recipe Plugin by EasyRecipe
3.2.2885

Filed Under: Lunch Tagged With: corn smut, gluten free, healthy, huitlacoche, low fat, masa flour, mexican food, soy free, tamales, Traditional recipes, vegan tamales

Kale and Pine Nut Pizza with GF Cauliflower crust

October 27, 2014 by India Leigh

Kale and Pine Nut Pizza with GF Cauliflower crust
cauliflower pizza crust
With the new website/blog now unwrapped and finally a more user friendly platform, I can once again concentrate on the business of recipes. I feel like I’ve been lagging behind with trying out my new recipe ideas and bringing you great vegan and gluten free foodie finds from the interweb. So I need to play catch up before I can thrust on and get up to speed. I need to tick off some of items on the ‘recipes to try’ list. So, here is a recipe that has been knocking around for a few years among some vegan, and gluten free blogs - Cauliflower Pizza Crust. Yes, pizza crust made from cauliflower. Gluten free, grain free and vegan. Sceptical? So was I. But, trusted sources espoused it’s merits so give it a go I must. Many peoples favourite things are pizza, many people love kale. So I decided to marry the two. Here for your delectation is kale and pine nut pizza with a gluten free cauliflower crust. Trust me on this one.

Crispy Kale & Pine Nut Pizza - Gluten Free Cauliflower Crust

Ingredients

1/2 cauliflower

1/2 cup non-sweetened coconut milk (or other non-dairy milk of choice)

1/2 cup milk (dairy or non-dairy)

3 tbs ground chia seed (or flax meal) to make chia egg

4 tbs nutritional yeast

1/4 cup reduced fat almond flour (sorghum works well too if you do not care if it is not grain free. Quinoa would probably work also.)

1/4 cup chickpea flour

a good pinch of pink Himalayan or sea salt

a good pinch of black pepper

1 tbs olive oil

Method

  • Preheat oven to 450f or as high as your oven allows. Line a baking sheet with parchment paper or a silicone mat.
  • Mix the non-dairy milk and the ground chia or flax seeds and leave to congeal. Just 5 or so mins should do the trick.
  • Roughly chop cauliflower and pop into a food processor or high speed blender until it breaks down to crumbs. Pop into a suitable container and microwave for 4 mins or to be healthier steam for 10 mins. Allow to cool then put the crumbs into cheesecloth and squeeze out as much water as you can.
  • Combine the drained cauliflower, chia ‘egg’, flours, nutritional yeast and seasonings. Mix to a dough. If the dough is too wet add more flour.
  • Halve the mixture and then pour the oil into your hands and form two balls. This ensures that the oil is coating the outside of the ‘dough’. Place onto a tray leaving room for each to be flattened and shaped into a 1/4 inch thick and roughly 7 inch circles. You may get more depending on size of your cauliflower (Did you know that in France it is called ‘chou-fleur’?…that’s so pretty!)
  • Bake for about 20 mins until turning golden brown, and crispy at the edges. Be beady eyed about it though as each oven is different and depending on the tides/moon phase/shoe size and your mood it could burn. Don’t let it burn.
  • Remove from the oven and allow to cool. Not sure of the science but like baking a cake, with gluten free stuff the resting makes for good bonding time. I’ve seen many recipes that say the pizza will not stand up to holding aloft but this one does.
  • Whilst your pizza crust is cooling, slice up some vegan cheese (or use slices..Violife are the best IMHO), bust out a can of condensed tomato paste, chop up your curly kale, and mince some garlic.
  • Now it is time to decorate those wonderful, gluten free, vegan pizza crusts! Take crust numero uno and spoon and spread over 2-3 tbs of tomato paste. Top with the sliced cheese and the garlic. Pop into the oven until cheese has melted. Grab out of oven and top with a sprinkling of pine nuts and the chopped kale, grind over some black pepper and a pinch of sea salt. Then carefully drizzle olive oil over the kale. Grab your oven mitts and pop the pizzas back under a medium grill until the kale turns crispy but not burnt. Burnt is not good.
  • Remove from the grill (or, if you are American the broiler..still cannot get my head around that though it is more obvious to call it that..darn my English upbringing!) and EAT.
  • Now, I have to be honest, I did not expect the crust to be that great once I’d tasted the raw mix but me-oh-my, once cooked and adorned it is a thing of sheer delight. Delizioso!

*tip. Gently remove the crusts from the baking parchment BEFORE you add your toppings so that your final product is not stuck to the baking parchment. If it sticks then wet the parchment with a little water and it will peel off, like those transfer tattoos we had as kids, leaving the crust liberated and intact).

cauliflower cauliflower blender cauliflower pizza dough vegan pizza crust kale, basil & pine nut pizza cauliflower pizza crust kale & pine nut topping

What will you top your pizza crust with?

Kale and Pine Nut Pizza with GF Cauliflower crust
 
Print
Prep time
15 mins
Cook time
10 mins
Total time
25 mins
 
Crispy Kale & Pine Nut Pizza - Gluten Free Cauliflower Crust
Author: India Leigh
Recipe type: Pizza
Cuisine: Pizza
Serves: 2
Ingredients
  • ½ cauliflower
  • ½ cup non-sweetened coconut milk (or other non-dairy milk of choice)
  • ½ cup milk (dairy or non-dairy)
  • 3 tbs ground chia seed (or flax meal) to make chia egg
  • 4 tbs nutritional yeast
  • ¼ cup reduced fat almond flour (sorghum works well too if you do not care if it is not grain free. Quinoa would probably work also.)
  • ¼ cup chickpea flour
  • a good pinch of pink Himalayan or sea salt
  • a good pinch of black pepper
  • 1 tbs olive oil
Instructions
  1. Preheat oven to 450f or as high as your oven allows. Line a baking sheet with parchment paper or a silicone mat.
  2. Mix the non-dairy milk and the ground chia or flax seeds and leave to congeal. Just 5 or so mins should do the trick.
  3. Roughly chop cauliflower and pop into a food processor or high speed blender until it breaks down to crumbs. Pop into a suitable container and microwave for 4 mins or to be healthier steam for 10 mins. Allow to cool then put the crumbs into cheesecloth and squeeze out as much water as you can.
  4. Combine the drained cauliflower, chia 'egg', flours, nutritional yeast and seasonings. Mix to a dough. If the dough is too wet add more flour.
  5. Halve the mixture and then pour the oil into your hands and form two balls. This ensures that the oil is coating the outside of the 'dough'. Place onto a tray leaving room for each to be flattened and shaped into a ¼ inch thick and roughly 7 inch circles. You may get more depending on size of your cauliflower (Did you know that in France it is called 'chou-fleur'?...that's so pretty!)
  6. Bake for about 20 mins until turning golden brown, and crispy at the edges. Be beady eyed about it though as each oven is different and depending on the tides/moon phase/shoe size and your mood it could burn. Don't let it burn.
  7. Remove from the oven and allow to cool. Not sure of the science but like baking a cake, with gluten free stuff the resting makes for good bonding time. I've seen many recipes that say the pizza will not stand up to holding aloft but this one does.
  8. Whilst your pizza crust is cooling, slice up some vegan cheese (or use slices..Violife are the best IMHO), bust out a can of condensed tomato paste, chop up your curly kale, and mince some garlic.
  9. Now it is time to decorate those wonderful, gluten free, vegan pizza crusts! Take crust numero uno and spoon and spread over 2-3 tbs of tomato paste. Top with the sliced cheese and the garlic. Pop into the oven until cheese has melted. Grab out of oven and top with a sprinkling of pine nuts and the chopped kale, grind over some black pepper and a pinch of sea salt. Then carefully drizzle olive oil over the kale. Grab your oven mitts and pop the pizzas back under a medium grill until the kale turns crispy but not burnt. Burnt is not good.
  10. Remove from the grill (or, if you are American the broiler..still cannot get my head around that though it is more obvious to call it that..darn my English upbringing!) and EAT.
  11. Now, I have to be honest, I did not expect the crust to be that great once I'd tasted the raw mix but me-oh-my, once cooked and adorned it is a thing of sheer delight. Delizioso!
  12. *tip. Gently remove the crusts from the baking parchment BEFORE you add your toppings so that your final product is not stuck to the baking parchment. If it sticks then wet the parchment with a little water and it will peel off, like those transfer tattoos we had as kids, leaving the crust liberated and intact).
Wordpress Recipe Plugin by EasyRecipe
3.2.2802

Filed Under: Entree/Mains, Lunch Tagged With: cauliflower, gluten free, gluten free pizza, kale., pizza, Vegan, vegan pizza toppings

Smokey Beet Burger Recipe

October 6, 2014 by India Leigh

People regularly rave about beet burgers. They bandy words around like ‘meaty’, flavoursome and hearty. Not sure about all those but they are oddly ‘beefy’ and quite juicy. These smokey beet burgers sit inside a bun quite a treat.

Upon fixing up my debut batch I did some research and 4 medium beets (beetroot) seemed to be the magic number used in most recipes, and who am I to swim against the tide?! I made them gluten free of course, and also omitted the brown rice used in many recipes. A few reasons for my slighting of the grain. One - rice tends to steal flavours and hide them away somewhere. Two - I did not have any. Three I don’t really eat it. Four well, let’s make it more paleo friendly. I adapted this The Kitchn recipe and made it my own. This looks like a great recipe from the Minimalist Baker, too, though I’ve not tried it.

Smokey Beet Burger Recipe

4 medium sized fresh beetroot

1 flax egg (1 tbs ground flax)

1 can of mixed beans in water (you can also use green lentils or black beans)

1/4 cup chickpea flour

1/4 cup almond flour

3 cloves garlic - diced

1 medium sized red or white onion diced

1 tsp cumin powder

1 tbs smoked paprika

1/2 tsp dried thyme

2 tbs apple cider vinegar

3/4 tsp salt

1/2 tsp freshly ground black pepper

oil for cooking (I used walnut oil)

optional - serve with vegan cheese, baby leaves, tomatoes and mango chutney or mustard.

Method

Make the flax egg by mixing your flax meal with 2 tbs warm water. Mix and leave to congeal.

Diced the onions and sauté in a little oil until caramelised. Throw in the garlic and cook for a further minute. Careful not to let it burn. Take off heat and leave to cool.

Peel and grate the beetroot into a bowl.

Drain the beans pop into a separate bowl and mash them with a stick blender or a potato masher. Stop just short of them becoming a puree, leave so a small amount remain whole, then add to the beets.

Add all the other ingredients and mix with your hands.

Line a plate or sheet pan with parchment paper and then using your hands form the mix to something resembling a burger. Think something akin to the size of a tea mug and about 1 inch thick. Pop each one on the parchment as you go. Then leave to rest in the fridge for at least an hour. They firm up nicely and make them easier to handle.

You could brush a pan with oil and bake in the oven for 30 mins on 190 degrees if you want them super healthy. I think they are healthy enough and I like the charred crispy edges you get in a fry pan. Just a little oil in the bottom, heat and then gently place in your burgers. Fry on a medium heat for about 5-6 mins each side until cooked and slightly charred.

Serve immediately. In a bun or not. Add your preferred fixings. On this occasion they were topped with vegan cheese, drizzled with tahini sauce, topped with cherry tomatoes, baby leaves and a generous spoon of lime chutney.

Any remaining can be cooled and then kept in the fridge for 3 days or frozen.

vegan burgers

vegan burger 1

I hope you enjoy. Let us know how you dress yours!


5.0 from 1 reviews
Smoky Beet Burgers Recipe
 
Print
Prep time
15 mins
Cook time
12 mins
Total time
27 mins
 
Easy, juicy smoky beet burgers.
Author: India Leigh
Recipe type: Entree/main
Cuisine: vegan Burger
Serves: 8 burgers
Ingredients
  • Smoky Beet Burgers
  • 4 medium sized fresh beetroot
  • 1 flax egg (1 tbs ground flax)
  • 1 can of mixed beans in water (you can also use green lentils or black beans)
  • ¼ cup chickpea flour
  • ¼ cup almond flour
  • 3 cloves garlic - diced
  • 1 medium sized red or white onion diced
  • 1 tsp cumin powder
  • 1 tbs smoked paprika
  • ½ tsp dried thyme
  • 2 tbs apple cider vinegar
  • ¾ tsp salt
  • ½ tsp freshly ground black pepper
  • oil for cooking (I used walnut oil)
  • optional - serve with vegan cheese, baby leaves, tomatoes and mango chutney or mustard.
Instructions
  1. Make the flax egg by mixing your flax meal with 2 tbs warm water. Mix and leave to congeal.
  2. Dice the onions and sauté in a little oil until caramelised. Throw in the minced garlic and cook for a further minute. Careful not to let it burn. Take off heat and leave to cool.
  3. Peel and grate the beetroot into a bowl.
  4. Drain the beans pop into a separate bowl and mash them with a stick blender or a potato masher. Stop just short of them becoming a puree, leave so a small amount remain whole, then add to the beets.
  5. Add all the other ingredients and mix with your hands.
  6. Line a plate or sheet pan with parchment paper and then using your hands form the mix to something resembling a burger. Think something akin to the size of a tea mug and about 1 inch thick. Pop each one on the parchment as you go. Then leave to rest in the fridge for at least an hour. They firm up nicely and make them easier to handle.
  7. You could brush a pan with oil and bake in the oven for 30 mins on 190 degrees if you want them super healthy. I think they are healthy enough and I like the charred crispy edges you get in a fry pan. Just a little oil in the bottom, heat and then gently place in your burgers. Fry on a medium heat for about 5-6 mins each side until cooked and slightly charred.
  8. Serve immediately. In a bun or not. Add your preferred fixings. On this occasion they were topped with vegan cheese, drizzled with tahini sauce, topped with cherry tomatoes, baby leaves and a generous spoon of lime chutney.
  9. Any remaining can be cooled and then kept in the fridge for 3 days or frozen.
Wordpress Recipe Plugin by EasyRecipe
3.2.2802

Filed Under: Entree/Mains Tagged With: beet burgers, gluten free, healthy food, soy free, Vegan

Low Fat Gluten Free Flours - Giveaway

September 24, 2014 by India Leigh

Low Fat Gluten Free Flours – Giveaway

reduced fat flours giveaway

I am excited to tell you about a recent discovery. Set to revolutionise your baking, and more. Low Fat Gluten Free Flours. Paleo, too, if that’s your bag. And 0% calorie brown sugar and icing sugar.

… 

Read More »

Filed Under: Beverages and Smoothies, Desserts & Sweets, Giveaways, Product Reviews, Uncategorized Tagged With: allergy free baking, almond flour, gluten free, low gi sweeteners, paleo, reduced fat, Vegan, zero calorie

A Vegan & Gluten Free Guide To Leipzig. Plus Handy Travel Tips

September 3, 2014 by India Leigh

A Vegan & Gluten Free Guide To Leipzig. Plus Handy Travel Tips
I arrived into Leipzig on the fast (70 min) ICE train from Berlin. The fare was not cheap (costs between €29-40) and I could have taken the more leisurely 2 hour, €8 bus, but I was impatient to get here. My first view of the city was the fun yellow and blue trams zipping in and out of the zone in front of the station.
Leipzig is another town hailed as the ‘new Berlin’, I heard that about Budapest (I visited recently) as well, but seriously, no where can be the new Berlin. Berlin is Berlin, Budapest is cool and very inexpensive and Leipzig has a charm all of it’s own. My curiosity, and my obsession with getting to grips with places that have a large vegan following (though that is becoming less and less unique..I am happy to say), were the driving forces behind my visit. I’ll give you a bit of background first and then we will delve a bit deeper and show you want you want to know…what I did I eat?.

The city of Leipzig borders a lush riparian forest, a forest which lies adjacent to a river, with towering trees. The Elster Saale canal runs alongside too. It is beautiful and surprisingly you can feel like some of the paths are leading you to the depths of nowhere, but the city is never that far away. Leipzigers really enjoy this area, and a canoe or two are always gliding through the shaded waters. I did not do that, but I did have lovely bike lent to me and I took the bone shaking cobbled street from my apartment, through the beautifully landscaped Clara Zetkin Park for a bit of red squirrel and nordic walkers spotting, to the forest everyday for some ‘green time’. I also biked to the Cospudener See, a large picturesque lake south of the city with white sandy beaches, where clothing is optional, or just biked along the canals that weave through the city. I could not help but note whilst exploring Leipzig, just how clean it is. No litter droppers here!

… 

Read More »

Filed Under: Europe, Germany Tagged With: Bauhaus, Dessau, eating out, fine dining, Germany, gluten free, HOME, monuments, plant based, pub food, restaurant reviews, things to do in Leipzig, transport, travel, travel tips, Vegan, vegan butcher, vegan travel

Potty About Herbed Pate - Recipe. Gluten Free, Soy Free

September 2, 2014 by India Leigh

Potty About Herbed Pate – Recipe. Gluten Free, Soy Free
Potty About Herbed Pate - Recipe. Gluten Free, Soy Free

… 

Read More »

Filed Under: Appetiser Tagged With: AUBERGINE, bean, gluten free, HOME, low fat, Pate, plant based, Recipes, soy free, thyme

  • « Previous Page
  • 1
  • 2
  • 3
  • 4
  • …
  • 16
  • Next Page »

About Me

Hi, my name is India. Welcome to A Vegan Obsession. This site is for you to enjoy the delicious discoveries of a gluten free, vegan traveller and cook. Read More…

  • Email
  • Facebook
  • Google+
  • Pinterest
  • Twitter

Search

Subscribe

Buy The Cooking App

V Is For Vegetable

Popular Posts

Vegan Cookbook Review and Giveaway
Lemon, cardamon cookies encrusted with dark chocolate and pistachio crumbs.
[Friday GIVEAWAY for Dog Lovers] Healthy Chew Bones For Your Darling Dog
Artisan Raw Chocolate Giveaway from Fine & Raw
A WEEK OF GIVEAWAYS!!  UK National Vegetarian Week.  Today A HUGE Box Of Hand Cooked Crisps from Ten Acre

Health

Crispy Kale & Pine Nut Pizza – Cauliflower Crust.

Crispy Kale & Pine Nut Pizza - Cauliflower Crust.

Healthy Vegan Santa Cruz

Healthy Vegan Santa Cruz

New Grains Gluten Free Vegan Bread – Review & Giveaway

New Grains Gluten Free Vegan Bread - Review & Giveaway

Healthy Vegan Fast Food In San Francisco

Healthy Vegan Fast Food In San Francisco

Connect

Discoveries of a gluten free, sugar free, vegan foodie. Read More…

Vegan Cookbook Review and Giveaway
Lemon, cardamon cookies encrusted with dark chocolate and pistachio crumbs.
[Friday GIVEAWAY for Dog Lovers] Healthy Chew Bones For Your Darling Dog
Artisan Raw Chocolate Giveaway from Fine & Raw
A WEEK OF GIVEAWAYS!!  UK National Vegetarian Week.  Today A HUGE Box Of Hand Cooked Crisps from Ten Acre
Baked Zucchini Fries with lemon aioli – Gluten free, low fat and crispilicious

Copyright © 2019 · Foodie Theme by Shay Bocks · Built on the Genesis Framework · Powered by WordPress